

Some carpet stains can’t be removed. The only way to get them out is with a patch. Here’s how to do it…
Tools You Need (And Substitutes If You Don’t Have Them)

1. Flat screwdriver.
Used to separate carpet fibers, which leads to cleaner cuts.
2. Utility or carpet knife.
A utility knife will work if you don’t have a carpet knife. But you’ll need new, sharp blades. Ideally, you’d have a carpet knife and blades, which are available at Lowe’s or Home Depot.
3. Scissors.
I use angled carpet scissors, but they’re expensive and most people don’t have them lying around. Sharp, heavy-duty kitchen shears might work as a substitute. Or maybe even a pair of tin snips.
4. Seam tape.
No substitutes here. You must buy a roll of seam tape. Should be under $10 at Lowe’s or Home Depot.
5. Hot glue gun and glue sticks.
Another must-have. No substitutes. But you don’t need anything special; an arts & crafts glue gun from Walmart or Hobby Lobby is fine.
6. Carpet tractor.
You probably have no clue what a carpet tractor is. Don’t worry, a heavy book or even your foot will work nicely as a substitute.
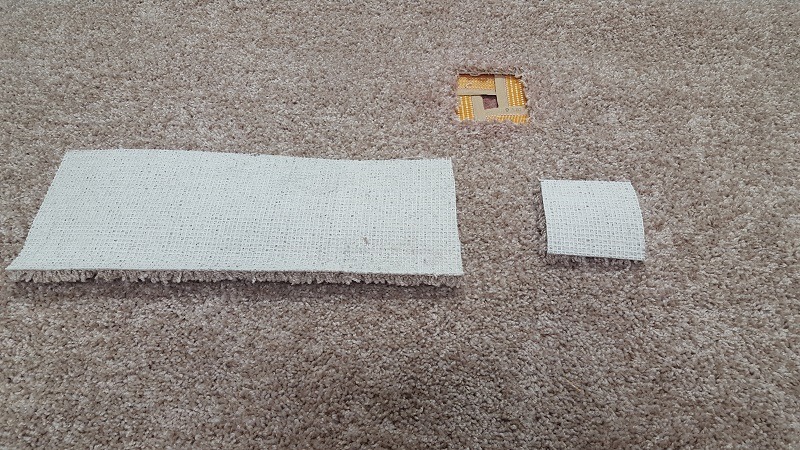
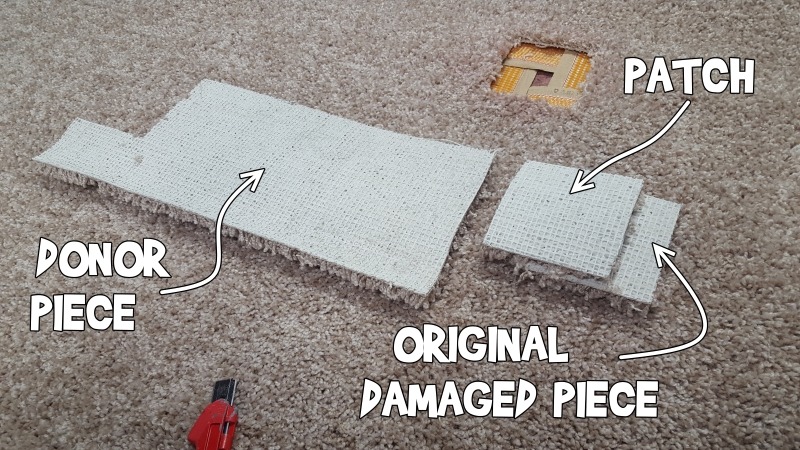
7. Donor piece of carpet. (not pictured above)
Hopefully you have a remnant of your carpet from when it was installed. If not, you’ll need to create a remnant by sacrificing a piece from a closet or other inconspicuous area. Not ideal, but it’ll do.
Initial Prep
Gather all these tools or appropriate substitutes, locate the carpet stain, and get ready to rock and roll. We’re about to get nuts.
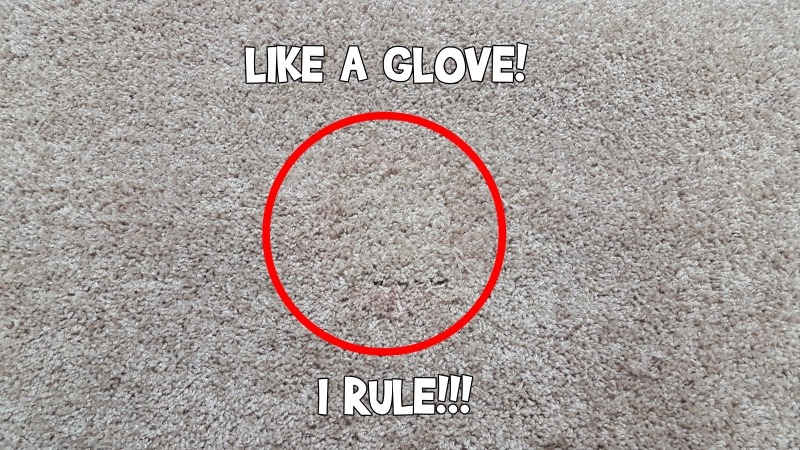
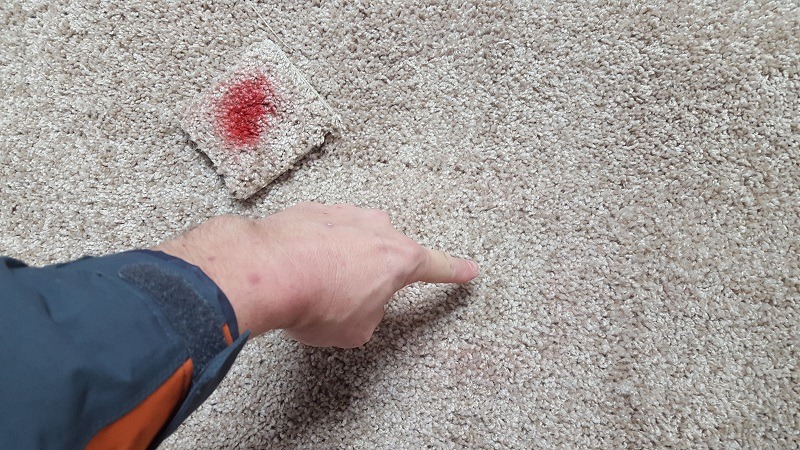
Here is a stain I’m going to patch today:

I made it with red spray paint. If you look closely, you can see faint overspray around the main stain. As we proceed, you might notice that I am only going to patch the main stain. Since this is for demonstration purposes, I decided not to worry about the overspray.
Step One: Separate Carpet Fibers
In a moment, we’re going to cut your stain out of the carpet. But you want to leave behind as many carpet fibers as possible. That way, when you insert the patch a few steps later, everything fits nicely and there won’t be any ugly gaps.
So take your flat screw driver and, “drawing” a square or rectangle, use it to separate the fibers around your stain. This will serve as a guide when cutting the stain out. It will also allow your blade to cut the carpet backing without harming surface fibers.
Right angles and parallel lines are your friends, so execute this step with care. An evenly shaped hole with 90° corners is much easier to patch than a hole with crooked and jagged edges and angles.
If you were to skip this step and go straight to cutting, you’d likely cut crooked, jagged lines, and you’d inadvertently rip out a bunch of precious fibers. Remember, the more fibers you leave behind, the more there are to obscure the seams of your patch. That’s a good thing.
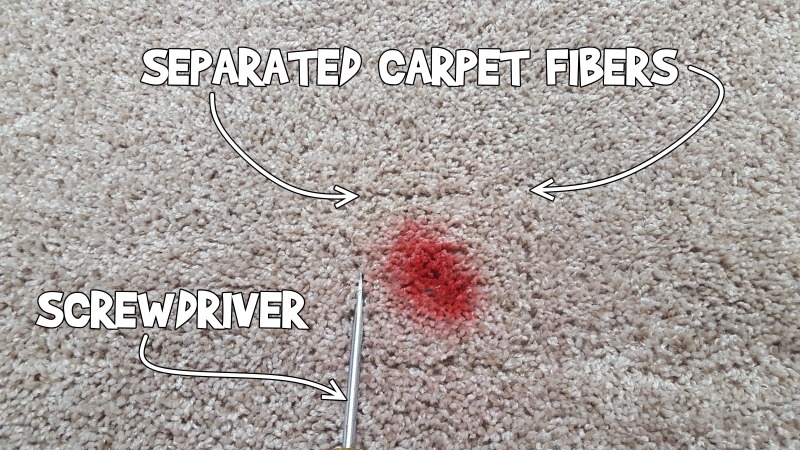
Looking closely at the above image, you should be able to see the vague outline of a square around the stain, which I made with my flat screwdriver. To make it easier for you to see, I’ve marked the top edge of the square between two arrows. These “channels” will allow me to make clean, straight cuts without destroying too many carpet fibers.
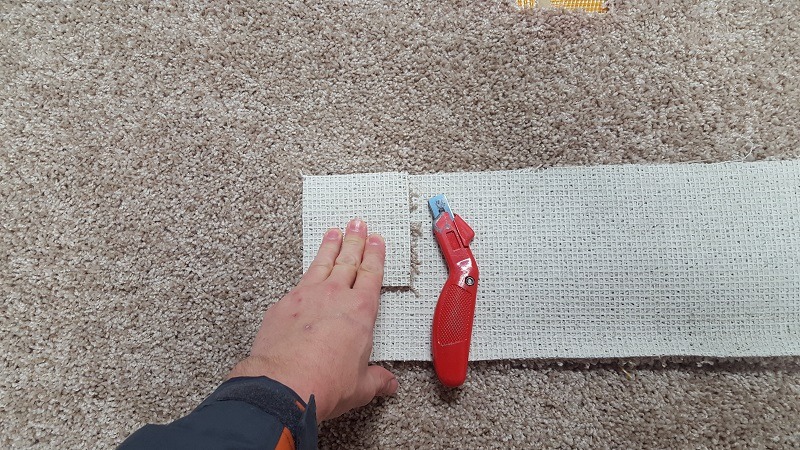
Step Two: Cut Out The Stain
I can’t stress this enough: YOU NEED A NEW, SHARP BLADE TO CUT CARPET.
Carpet backing is extremely rough. It’s hard to cut and it dulls blades very quickly. A dull blade will make shredded, torn cuts, which is exactly what you don’t want. Use only sharp blades so you can make neat, clean cuts. Your patch will look much better as a result.
Using the channels you made with your screwdriver as guides, cut out the stain. Don’t cut too far past each channel. You want to cut a square hole, not a hashtag shape.


Once you’ve cut a nice, even square, remove it from the rest of the carpet. It’s extremely important to keep track of how it was oriented. Carpet has a nap, meaning the fibers naturally lay in a certain direction.
When you insert a patch into the hole you’ve just made, the patch must match the nap of the surrounding carpet. If the patch is quarter or half-turned, it will be very visible because the nap won’t lay the same way as the rest of the carpet. In fact, it can look like a completely different color.
Don’t worry, I’ll tell you how to make sure your new piece is properly oriented in just a moment. For now, just make sure you keep track of how the damaged piece was originally oriented. If you have a bad memory like me, consider using a Sharpie to mark directional arrows on the damaged piece. It’s really important to keep track of its original orientation.
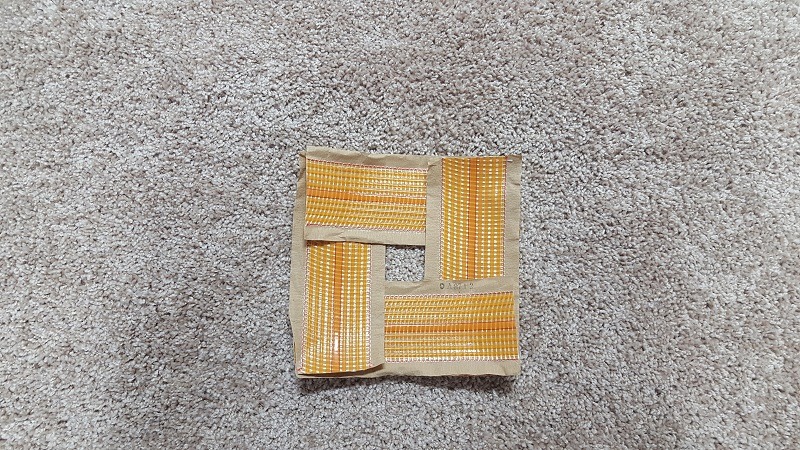
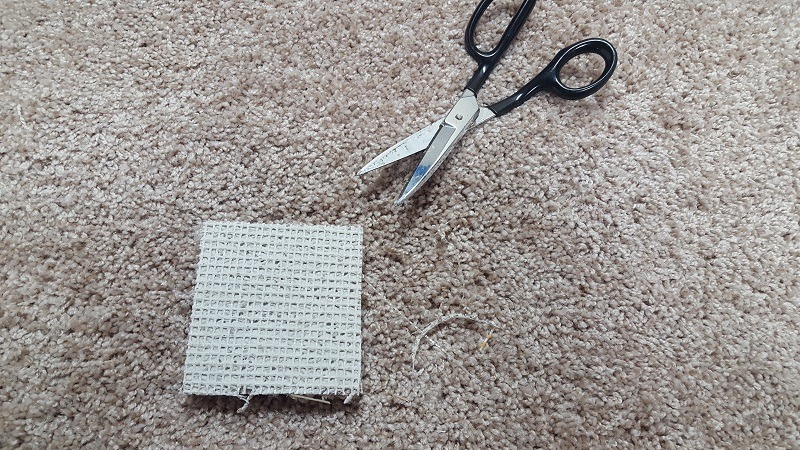
Step Three: Arrange Seam Tape
Cut four strips of seam tape that will line up under the edges of the hole you just made. It will eventually look like this:
Simply cut four strips, one for each edge. Each strip should be a little longer than its corresponding edge.
Arrange the strips like this underneath the carpet:
This arrangement eliminates lumps that might otherwise be visible through the carpet when your patch is finished. It also makes it easier to neatly apply hot glue, which we’ll do in a later step.
By the way, now would be a good time to plug in your hot glue gun. We’ll need it in a few minutes, and this will give it time to heat up.
Some people don’t use seam tape when doing small patches. This is a mistake. If you glue carpet directly to the padding, the glue won’t hold and the patch will look awful after a while.
Also, if your patch is very small, you might need just one or two strips of seam tape instead of the arrangement shown above. Use common sense.
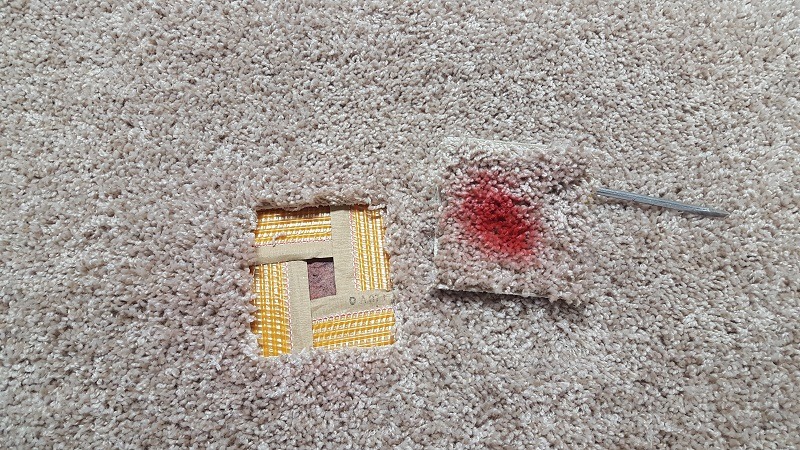
Step Four: Cut The New Piece
Here’s EXACTLY what I want you to do next. Leave your damaged piece exactly where you put it, hopefully still oriented in precisely the same way as when it was attached to the rest of the carpet.
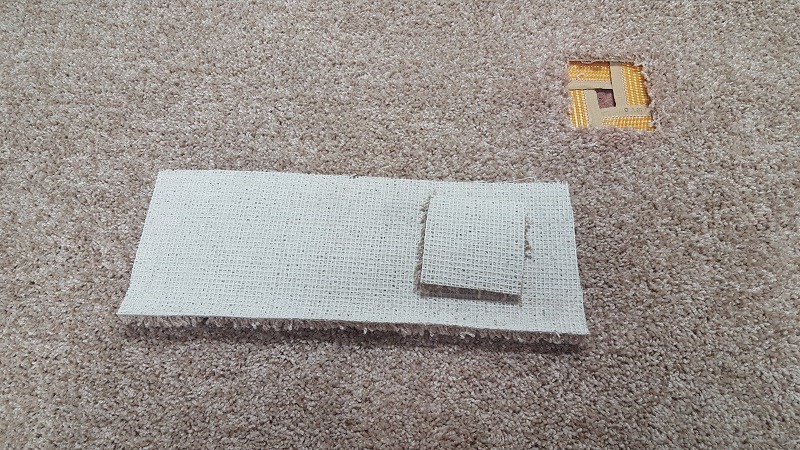
Get your donor piece and put them side by side, like so:
Now flip both pieces over as I’ve done in the image below. Just make sure you memorize exactly how that damaged piece came out of the surrounding carpet. Again, it might be helpful to mark it so you don’t get confused.
Now place the damaged piece, which will serve as your template, atop the donor piece, like this:
Perfect! Now what we need to do is make sure the nap of both pieces is running the same way, so our patch will look good when we’re finished. Let’s zoom in and note some things about these two pieces…
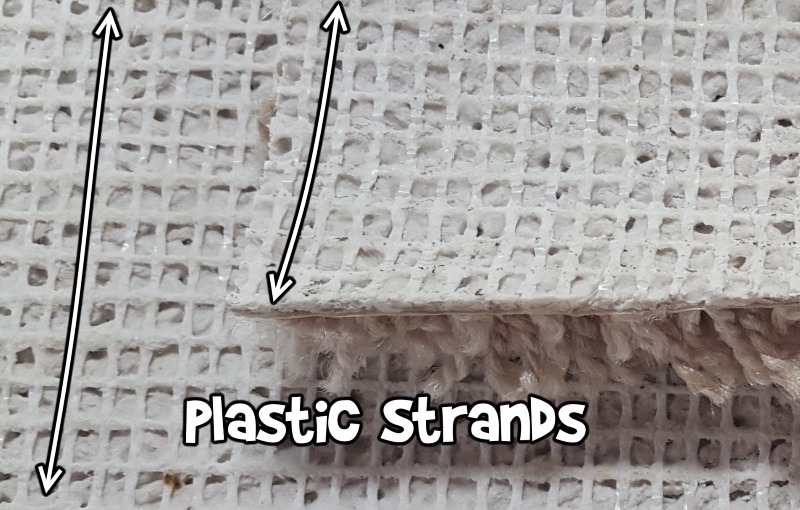
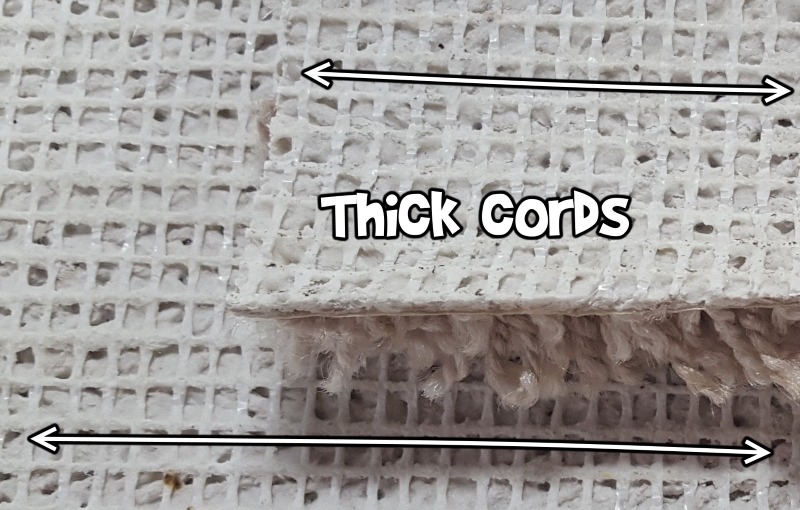
As you can see in the above photos, each piece of carpet is woven with plastic strands running one way, and thick cords running the other. If you can’t see this in the photos, I promise it’s easy to see in real life.
Leave the damaged piece–your template–exactly as it is so you can keep track of what direction it was removed from the carpet.
Rotate the donor piece underneath it until the plastic strands and thick cords are running the same direction on both pieces.
Excellent! Now flip the pieces back over so the fuzzy sides are facing up. Remember, you still want the damaged piece to be oriented in its original direction. And you want the plastic strands and thick cords of the donor piece to be running in the same direction as the damaged piece.
For now, set the damaged piece aside, and focus on the donor piece. Why? Because we’re still not exactly sure if the donor piece is aligned with the surrounding carpet. We’re only halfway there.
Yes, the plastic strands and thick cords are properly aligned with the damaged piece at this point. Which, in turn, means the strands and cords of the donor piece are also aligned with the original surrounding carpet. However, the donor piece could still be half-turned. Here’s how to make sure it’s not…
Your donor piece is sitting atop the surrounding carpet, correct? Correct. Simply brush the fibers of both the donor piece and the surrounding carpet in the same direction. Now brush in the opposite direction.
You’ll notice that the carpet appears lighter when you push the nap one way, and it looks darker when you push it the other way. That is how we’ll make sure the donor piece is properly oriented!
As long as the donor piece nap matches the “color” of the surrounding carpet nap, you’re good to go! See the images below:
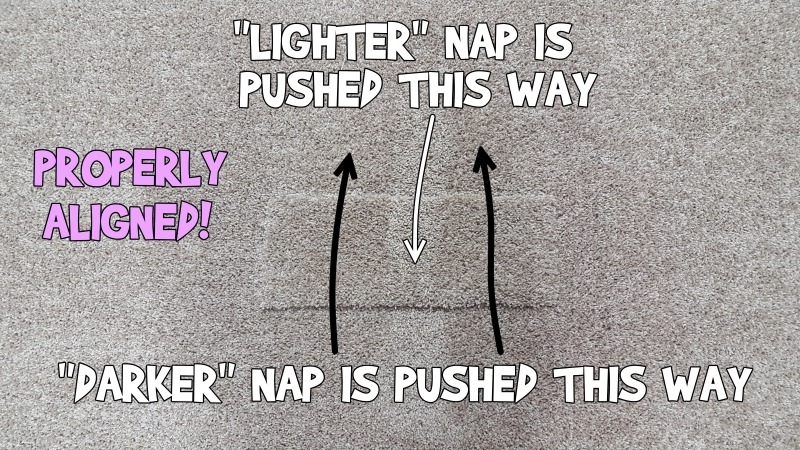
Above, you see my donor piece atop the surrounding carpet. Using the palm of my hand, I first brushed all the nap away from me. In this case, from my perspective, it made the carpet appear darker. Then, I brushed a strip down the middle towards me, making that strip appear lighter.
Since the appearance of the donor piece matches the appearance of the surrounding carpet, I know it’s aligned properly.
If that’s difficult for you to see, here’s the same photo, but without the arrows and notes:
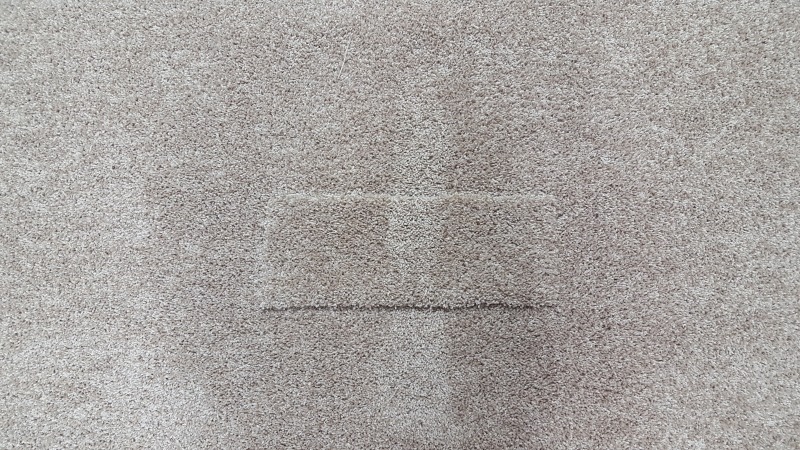
Do you see the “lighter” strip down the middle? Since the donor piece matches the surrounding carpet, we know they are are properly aligned. And we can be doubly sure because we also matched the direction of the plastic strands and thick cords in the backing.
The backing AND the nap must match up on both pieces. It’s possible to have the backing matched, but the nap doesn’t match. In that case, the carpet would be half-turned out of alignment.
It’s also possible to have the nap appear to match when, in fact, the backing is not matched. In that case, the carpet would be quarter-turned out of alignment.
Which leads to the question, “What happens if I have the backing properly aligned, but the nap doesn’t match?”
Great question. Let’s use my donor piece as an example. We’ve already made sure the backing of my donor piece is aligned with the damaged piece, and in turn, the surrounding carpet. But it could still be half-turned out of alignment. If so, it will look like this:
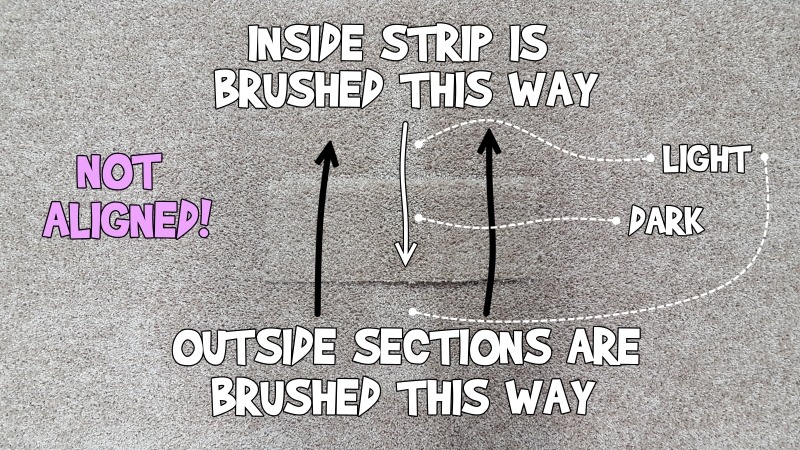
Above, you can see how the nap on these pieces of carpet doesn’t match. In particular, look at the inside strip, which I brushed in the same direction on both pieces. Yet, it appears darker on the donor piece, which is sitting on top, and lighter on the surrounding carpet which is underneath. This tells us the two pieces are not aligned, even if the direction of the backing matches.
In the image above, the donor piece is half-turned out of alignment. Remember, the backing matches. But the nap does not.
Here’s what it looks like without the arrows and notes. Maybe you can see it better:
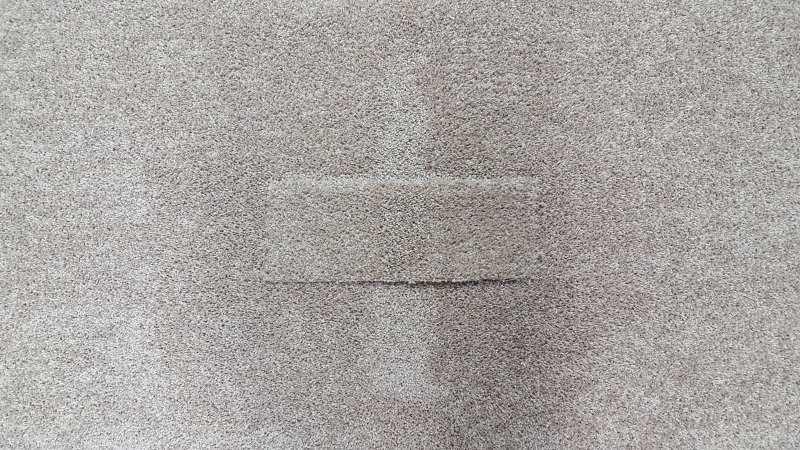
When this happens, it’s not a big deal. All you have to do is rotate the donor piece 180°. That does two things: First, the nap will be properly aligned. And second, the plastic strands and thick cords on the backing of both pieces will still be aligned.
I want to stress this again: The backing AND the nap of the donor piece MUST be matched to the surrounding carpet. Otherwise, the patch will stick out like a sore thumb.
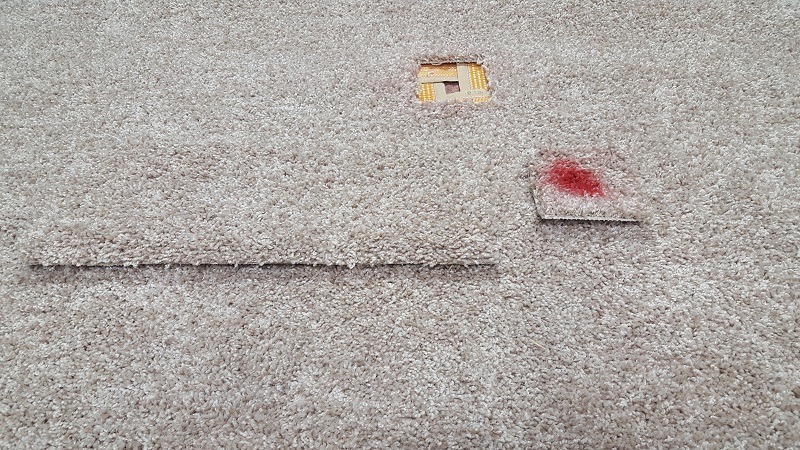
Once you get the donor piece properly aligned, congrats, you’re officially ready to cut out your final patch!
Here’s what we’re gonna do… Once again, set your damaged piece and your donor piece side-by-side, being sure to keep them properly aligned. Remember, at this point, the backing of both pieces should be lined up, and the nap of both pieces should be lined up. We went through a lot of work to achieve this, so we don’t want to mess it up now.
For the second time, turn both pieces over so the backing is facing up. Place the damaged piece, which is your template, atop the donor piece. It’ll look something like this:
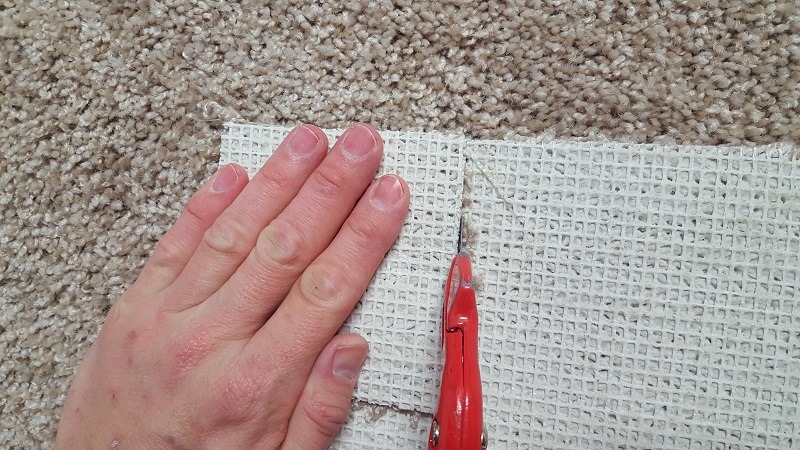
Again, we’re going to use the damaged piece as a template to cut around. Since my damaged piece and donor piece both have nice 90° angles at their upper left-hand corners, that’s where I’ll start cutting. That way, I only have to make two cuts instead of four.
That may or may not work for you. Use common sense and you’ll be fine.
Before you start cutting, I recommend changing your knife blade. Yes, I realize you’ve barely used it up to this point, but don’t underestimate how valuable clean, sharp cuts are.
As pictured below, cut around the edges of your template. Personally, I do this directly atop the surrounding carpet, and I’ve never had an issue with damaging it. But if you’re worried about cutting all the way through the donor piece and into the surrounding carpet below, you could place a piece of thick cardboard under the donor piece.
I don’t recommend carrying the donor piece and template to another area to make your cuts because you might forget how the pieces are supposed to be oriented when you return to the work area.
When you’re done, you’ll have something like this:
Now turn all three pieces over, once again being careful to keep them properly oriented. Again, we went through a lot of work to make sure the donor piece is aligned with the surrounding carpet, so don’t forget to keep track of it…
Nice! At this point, you can discard the donor piece and the damaged piece. From this point on, we only need the patch.
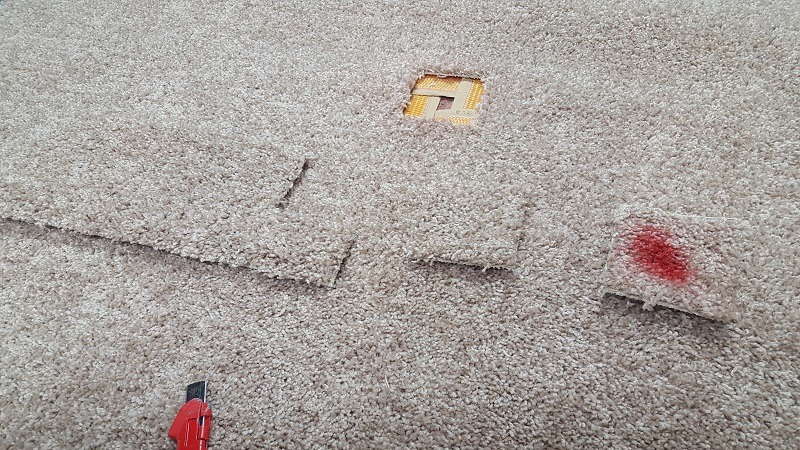
Step Five: Check The Fit
This part is pretty simple. Place your new patch into the hole to see how well it fits. Just don’t forget to make sure the nap is facing the right way.
Since I’ve been doing this for a long time, my piece fits pretty good. In fact, it’s hard to see in the image below, and it hasn’t even been glued in yet. I circled it in red so you can see it:
If yours doesn’t fit that well, it’s okay. If it’s too small, simply cut a new patch (assuming you have enough left in your donor piece). If it’s too big, use your scissors to fine tune the edges until it fits nicely.
But the key is, you don’t want it to fit too snug. If it’s too snug, the patch could distort the surrounding carpet, making the final result look weird and lumpy. In fact, slight gaps are ideal, like so:
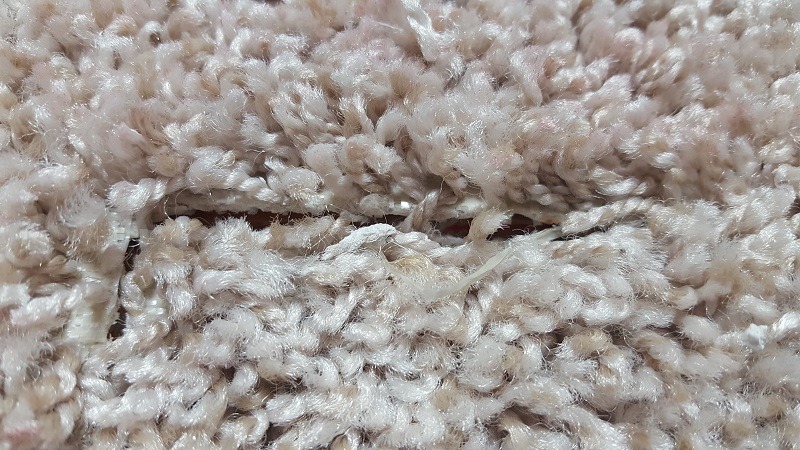
See those gaps around the edges? That’s perfectly okay. Carpet is a forgiving medium. Once we glue the patch into place, the carpet fibers will conceal the seams. But don’t make your gaps bigger than pictured above. If they’re too big, the seams will be easy to spot, even from a distance. And we want this repair to be as invisible as possible.
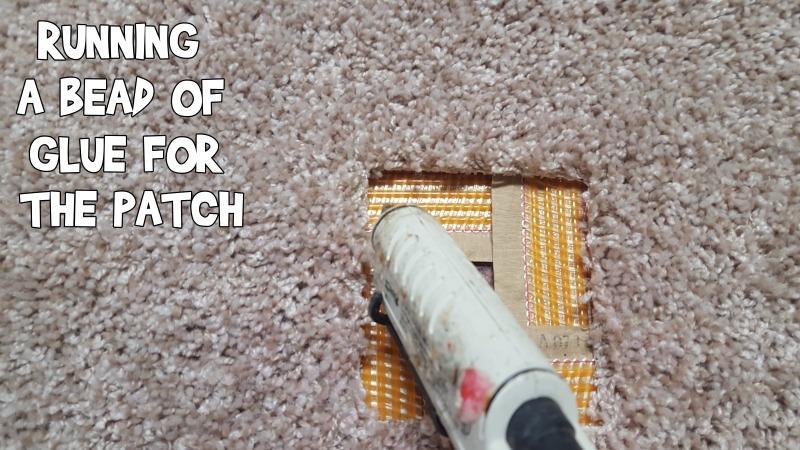
Step Six: Hot Glue
This is probably the most difficult step. Make sure not to burn your fingers, and don’t accidentally squirt hot glue on top of the carpet. You’ll end up with a bigger mess than you started with.
I recommend gluing two edges of your patch at a time because the glue stays tacky for only about 45 seconds. After that, it’s already cooled down and starting to cure, which means it won’t get a good grip on your patch.
If you’re good, you can probably lay down enough glue to do the whole patch in one shot. But it’s risky, because you don’t want that glue to start cooling down before you get the patch situated. That’s why, as a beginner, I suggest you start with just two edges. (And if your patch is large, you might even start with one edge.)
Run beads of glue along two edges of the hole. Keep in mind you want glue under the surrounding carpet…
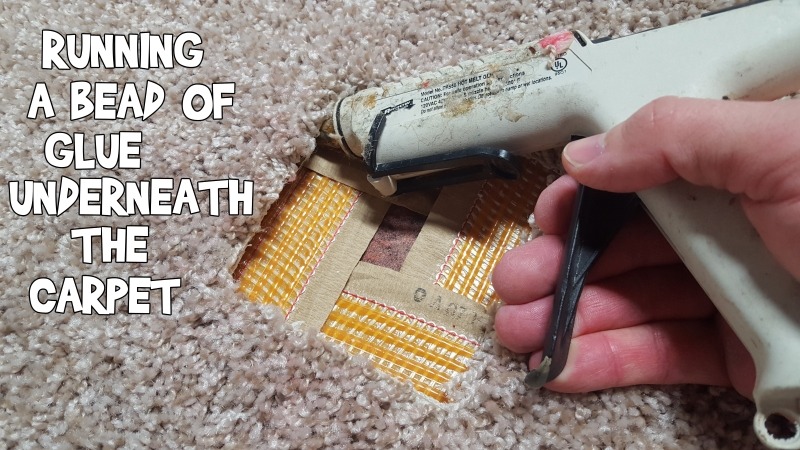
AND under the patch itself…
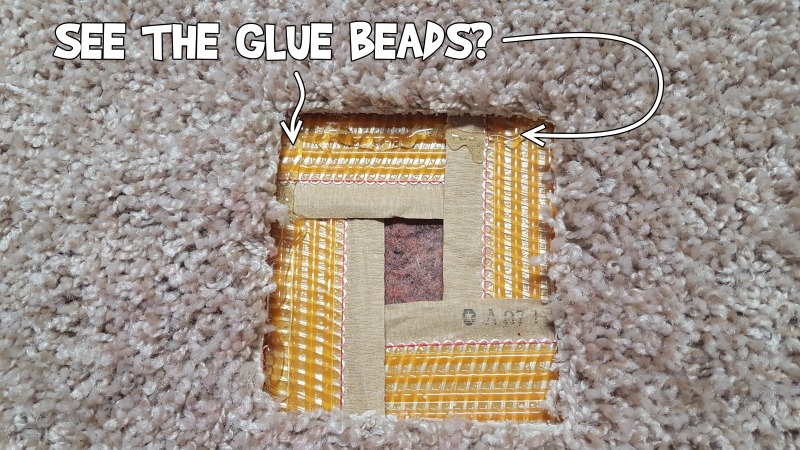
When you’re done, it should look something like the image below (obviously, you can’t see the glue beads underneath the surrounding carpet, but they’re there):
Now situate the patch inside the hole, being careful not to burn your fingers or smush glue onto healthy carpet fibers. Once it’s precisely where you want it, immediately put weight on the two seams that have glue.
I use a carpet tractor for this. Since you probably don’t have one, either stand on the seams or place heavy books on top of them for 30-45 seconds. This will lock the patch into place as the glue cools down and cures.

Next, lift the unglued corner of the patch, insert your glue gun, and run beads for the other two seams, just like you did for the first…
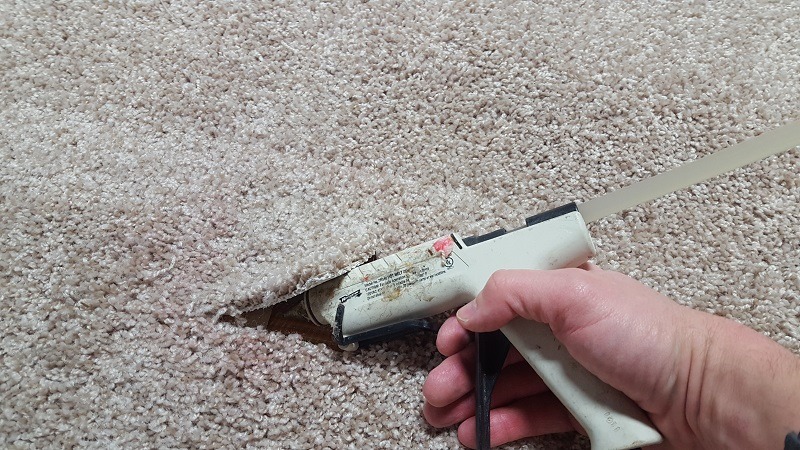
This part is tricky. You do NOT want to get hot glue on the carpet. It won’t come off, and if it gets smeared, it turns white when it dries. It looks awful, so make sure you keep all glue underneath the carpet!
(If you do happen to get a drop of glue on the carpet, leave it alone and let it completely cool down. Then you can easily snip it from the carpet with sharp scissors or nail clippers. It’s much easier to remove an undisturbed glue droplet than one that’s been smeared.)
Once again, put weight on the last two seams for 30-45 seconds, just like you did with the first two.
And that’s it. You’re officially done!
If you’re as awesome as me, your patch will look like this:
Invisible, isn’t it? And yes, that’s the actual patch I just did. If you don’t believe me, note the slight paint overspray on the surrounding carpet.
Anyway, after a minute or two, the hot glue will have cooled down, and your patch will be permanently locked into place. You can walk on it and even vacuum it at this point.
Of course, many scenarios might call for a patch, some quite different than shown in this article. For example, maybe your cat clawed a section of carpet so badly there’s no viable piece to cut out and use as a template. Or maybe you need to patch a much larger area than demonstrated.
In such cases, the steps may differ from what I’ve outlined here. If you find yourself in a pickle and you need some help, feel free to call or text me, Ross, at 317-370-9075. If you prefer email, click here to send a message.
And if you live in or around Indy and you’d like me to take care of a patch for you, give me a buzz and we can set up an appointment.
Thanks for reading!